Mine Accounting Documentation Page
Click on the link below to watch the video or if you prefer check out our writing guide in the section below
Complete Guide: Export Payroll Data from Gusto for Odoo Integration
Streamline your payroll accounting with step-by-step instructions
Table of Contents
Overview & Benefits
Why Export Gusto Payroll Data to Odoo?
While Gusto and Odoo don't have a native integration, you can easily export payroll journal entries from Gusto and import them into Odoo for comprehensive financial management. This approach offers significant advantages for SME businesses.
Benefits
- • Centralized financial data in Odoo
- • No custom development required
- • Full control over import process
- • Cost-effective solution
- • Monthly processing keeps it manageable
- • Maintains audit trail in both systems
Considerations
- • Manual process (30 min/month)
- • Requires account mapping setup
- • Not real-time synchronization
- • Need to maintain consistent process
- • Potential for human error
Perfect for Monthly Payroll
Monthly payroll processing makes this approach ideal - you'll only need to export and import once per month, taking approximately 30 minutes total. This gives you 80% of the benefits of full integration with 20% of the complexity.
Prerequisites
Before You Begin
Gusto Admin Access
You need admin access to Gusto with one of these permissions:
- • Run payroll
- • View payroll reports and tax filings
Odoo Setup
Ensure you have:
- • Odoo Accounting module installed
- • Chart of accounts configured
- • Payroll journal created
- • Import permissions in Odoo
Account Mapping Plan
Prepare your account mapping between Gusto and Odoo:
- • Identify corresponding accounts
- • Document the mapping
- • Test with sample data
Method 1: Standard Payroll Journal Report
Recommended for Most Users
This is the simplest method to get started. Gusto's standard Payroll Journal Report provides all the essential data you need for Odoo import.
Step-by-Step Instructions:
Log into Gusto
Sign in to your Gusto admin account using your credentials.
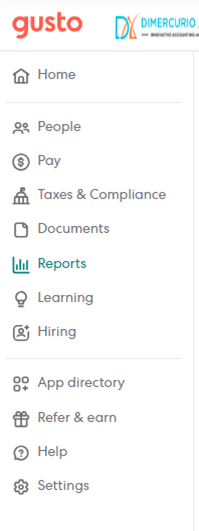
Navigate to Reports
Click on the "Reports" tab in the left navigation menu.
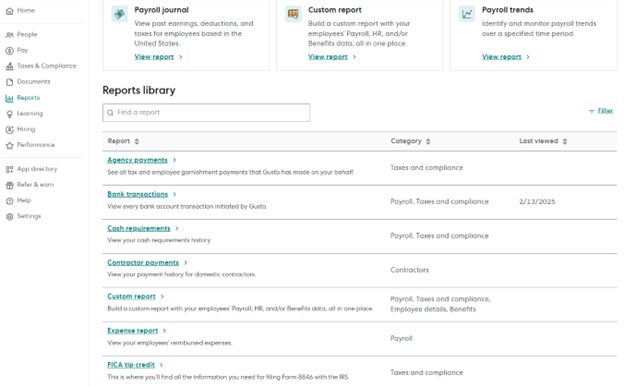
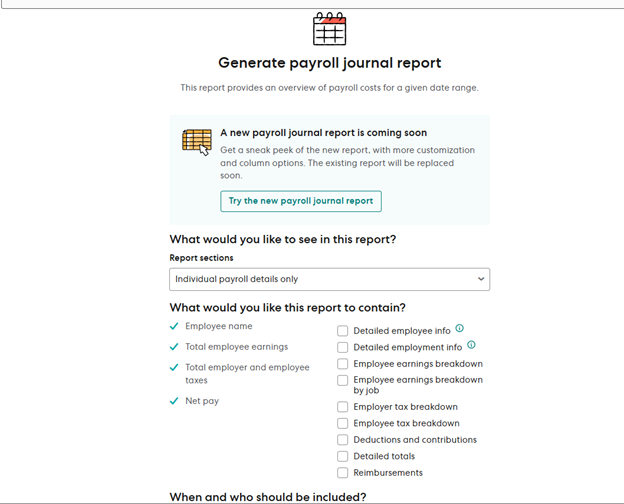
Select Payroll Journal Report
From the available reports, locate and select the "Payroll Journal Report".
Set Date Range
Configure the report for your monthly payroll period:
- • Select start date (first day of month)
- • Select end date (last day of month)
- • Or choose specific payroll dates
Export as CSV
Choose CSV format for easy import into Odoo:
- • Click "Generate Report"
- • Select format: CSV (not PDF)
- • Download the file
Important Note:
The standard Payroll Journal Report may not map perfectly to your Odoo chart of accounts. You may need to manually adjust account codes after export or use Method 3 (General Ledger Mapper) for automatic mapping.
Method 2: Custom Reports
Most Flexible Approach
Create custom reports tailored to your specific needs. This method gives you complete control over which data fields to include and how to structure the export.
Step-by-Step Instructions:
Access Custom Reports
Navigate to Reports → Custom Report in your Gusto dashboard.
Configure Report Structure
Set up how you want your data organized:
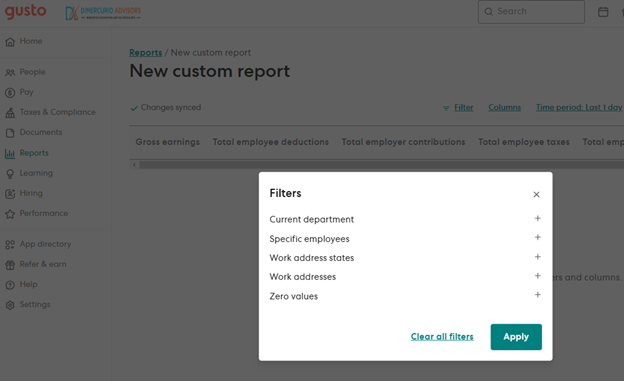
- • Break down by: Payroll, Employee, or Work Address
- • Time period: Select your monthly date range
- • Specific payrolls: Choose individual payroll runs
Select Data Columns
Choose which fields to include in your export:
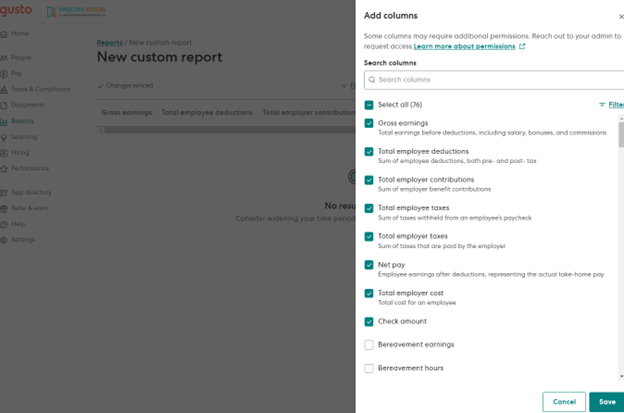
| Essential Columns for Odoo | Optional Columns |
|---|---|
|
• Gross earnings • Total employee deductions • Total employer contributions • Total employee taxes • Total employer taxes • Net pay |
• Employee details • Department breakdown • Job codes • Project tracking • Overtime details • Benefit specifics |
Save as Template
Create a reusable template for future months:
- • Click "Save as Template"
- • Name it "Monthly Payroll Journal for Odoo"
- • This saves time for future exports
Export to CSV
Generate and download your custom report:

- • Click "Download" button
- • Select CSV format
- • Save file with descriptive name
Pro Tip:
Once you've created your template, future monthly exports will take less than 5 minutes. Just load the template, adjust the date range, and export!
Method 3: General Ledger Mapper
Advanced Account Mapping
The General Ledger Mapper allows you to map Gusto expense categories directly to your Odoo chart of accounts. This provides the most accurate and automated account mapping.
Initial Setup (One-time):
Access General Ledger Mapper
Navigate to App Directory → Accounting → General Ledger Mapper:
- • Go to App Directory in Gusto
- • Under "Categories," choose Accounting
- • Select General Ledger Mapper
- • Click "Connect"
Upload Odoo Chart of Accounts
Export your chart of accounts from Odoo and upload to Gusto:
Column 1: Account Codes (e.g., 620000)
Column 2: Account Names (e.g., Salaries & Wages)
- • Export chart of accounts from Odoo as CSV
- • Click "Upload CSV" in Gusto
- • Choose your file and click "Open"
Map Gusto Categories to Odoo Accounts
Connect each Gusto expense category to corresponding Odoo account:
| Gusto Category | Typical Odoo Account |
|---|---|
| Gross Wages | 620000 - Salaries & Wages |
| Federal Tax | 241000 - Federal Tax Payable |
| State Tax | 241100 - State Tax Payable |
| FICA | 241200 - FICA Payable |
| Health Insurance | 241300 - Benefits Payable |
| Net Pay | 211000 - Payroll Payable |
Configure Advanced Options (Optional)
Set up additional mapping by departments, jobs, or projects:
- • Department mapping: Different accounts per department
- • Job code mapping: Separate tracking by job roles
- • Project mapping: Track costs by project
Monthly Export Process:
Navigate to Pay History
Go to Pay → Pay History in your Gusto dashboard.
Select Monthly Payroll
Find your monthly payroll run and click "View Details".
Download Mapped Report
Click "Download" to get your pre-mapped CSV file ready for Odoo import.
Key Advantage:
Once configured, the General Ledger Mapper automatically applies your account mappings to every export. This eliminates manual account code adjustments in Odoo.
Account Mapping Guide
Proper account mapping is crucial for accurate financial reporting. Here's a comprehensive guide to mapping common Gusto payroll categories to standard Odoo accounts.
Standard Account Mapping
| Gusto Category | Account Type | Odoo Account Code | Odoo Account Name | Notes |
|---|---|---|---|---|
| Gross Wages | Expense | 620000 | Salaries & Wages | Total employee compensation |
| Federal Income Tax | Liability | 241000 | Federal Tax Payable | Employee tax withholding |
| State Income Tax | Liability | 241100 | State Tax Payable | State-specific withholding |
| Social Security (Employee) | Liability | 241200 | FICA Payable | Employee portion |
| Medicare (Employee) | Liability | 241201 | Medicare Payable | Employee portion |
| Social Security (Employer) | Expense | 625000 | Payroll Tax Expense | Employer portion |
| Medicare (Employer) | Expense | 625001 | Medicare Tax Expense | Employer portion |
| FUTA | Expense | 625100 | Federal Unemployment Tax | Employer federal unemployment |
| SUTA | Expense | 625200 | State Unemployment Tax | Employer state unemployment |
| Health Insurance | Liability | 241300 | Benefits Payable | Employee benefit deductions |
| 401k Employee | Liability | 241400 | 401k Payable | Employee retirement contributions |
| 401k Employer Match | Expense | 626000 | Retirement Benefits Expense | Company match expense |
| Net Pay | Liability | 211000 | Payroll Payable | Amount paid to employees |
Important Considerations:
- • Account codes may vary based on your Odoo chart of accounts setup
- • Some businesses prefer to separate payroll taxes by state
- • Consider department-specific wage accounts for better reporting
- • Verify account types (Asset, Liability, Expense) match your setup
Importing to Odoo
Once you've exported your payroll data from Gusto, follow these steps to import it into Odoo accounting.
Step-by-Step Import Process
Prepare the CSV File
Clean and format your Gusto export for Odoo import:
- • Remove unnecessary columns
- • Ensure account codes match your Odoo chart
- • Verify date formats (YYYY-MM-DD)
- • Check for any special characters
Access Odoo Journal Entries
Navigate to the journal entry import function:
- • Go to Accounting → Miscellaneous → Journal Entries
- • Click "Import" or "Upload" button
- • Select your prepared CSV file
Map CSV Columns
Match your CSV columns to Odoo fields:
| CSV Column | Odoo Field |
|---|---|
| Date | Date |
| Account Code | Account |
| Description | Label |
| Debit | Debit |
| Credit | Credit |
| Reference | Reference |
Preview and Validate
Review the import preview before processing:
- • Check that debits and credits balance
- • Verify account codes are correct
- • Ensure dates are properly formatted
- • Review any error messages
Import and Post
Complete the import process:
- • Click "Import" to process the data
- • Review the created journal entries
- • Post the entries when satisfied
- • Create a backup before posting
Import Template Tip:
After your first successful import, save the column mapping as a template in Odoo. This will streamline future monthly imports to just a few clicks.
Best Practices
Do's
- Create a monthly routine - process payroll and export immediately
- Use consistent file naming: "Payroll_YYYY_MM_Gusto.csv"
- Always export as CSV, not PDF
- Set up import templates in Odoo for consistency
- Keep backup copies of all export files
- Document your account mapping for reference
- Review imported entries before posting
- Reconcile with bank statements monthly
Don'ts
- Don't wait until tax season to start exporting
- Don't manually edit account codes in CSV - use mapping
- Don't skip the preview step in Odoo imports
- Don't delete original export files after import
- Don't post entries without balancing verification
- Don't change account mapping mid-year without documentation
- Don't rely on memory - document your process
- Don't forget to update mappings when adding new payroll items
Monthly Workflow Checklist
Week 1 (Payroll Processing)
- □ Process monthly payroll in Gusto
- □ Verify all employees and amounts
- □ Submit payroll for processing
Week 2 (Export & Import)
- □ Export payroll journal from Gusto
- □ Review and clean CSV file
- □ Import into Odoo
- □ Verify import accuracy
Week 3 (Reconciliation)
- □ Reconcile with bank statements
- □ Post journal entries
- □ Review payroll reports
- □ File export for records
Troubleshooting
Common Issues & Solutions
Issue: CSV Import Fails in Odoo
The CSV file won't import or shows errors
- • Check CSV format - ensure UTF-8 encoding
- • Verify account codes exist in Odoo
- • Remove special characters from descriptions
- • Ensure debits and credits balance
- • Check date format is YYYY-MM-DD
Issue: Account Mapping Errors
Transactions are posting to wrong accounts
- • Review and update General Ledger Mapper settings
- • Verify account codes in both systems
- • Check for new payroll items in Gusto
- • Update account mapping documentation
Issue: Unbalanced Journal Entries
Debits don't equal credits in imported entries
- • Check for missing entries in Gusto export
- • Verify all payroll components are included
- • Review employer tax calculations
- • Check for rounding differences
Issue: Missing Payroll Data
Some payroll information is not appearing in reports
- • Verify date range covers all payroll periods
- • Check user permissions in Gusto
- • Ensure payroll is fully processed
- • Review report filters and settings
Getting Help
Gusto Support
- • Gusto Help Center
- • Live chat in your Gusto account
- • Phone support for admin users
Odoo Support
- • Odoo Documentation
- • Community forums
- • Professional support services
Official Resources & Documentation
Essential Links
Gusto Official Documentation
Quick Reference
Gusto Login: https://app.gusto.com/login
Gusto Support: https://support.gusto.com/
Odoo Documentation: https://www.odoo.com/documentation
Conclusion
Exporting payroll data from Gusto to Odoo doesn't have to be complicated. With the right approach and a consistent monthly routine, you can maintain accurate financial records without the complexity of custom integrations.
Key Takeaways:
- • Monthly payroll processing makes this approach highly manageable
- • Choose the method that best fits your business complexity
- • Consistent processes reduce errors and save time
- • Proper account mapping is crucial for accurate reporting
- • This solution provides 80% of integration benefits with minimal complexity
Complete Guide: Export Payroll Data from Gusto for Odoo Integration
Streamline your payroll accounting with step-by-step instructions
Table of Contents
Overview & Benefits
Why Export Gusto Payroll Data to Odoo?
While Gusto and Odoo don't have a native integration, you can easily export payroll journal entries from Gusto and import them into Odoo for comprehensive financial management. This approach offers significant advantages for SME businesses.
Benefits
- • Centralized financial data in Odoo
- • No custom development required
- • Full control over import process
- • Cost-effective solution
- • Monthly processing keeps it manageable
- • Maintains audit trail in both systems
Considerations
- • Manual process (30 min/month)
- • Requires account mapping setup
- • Not real-time synchronization
- • Need to maintain consistent process
- • Potential for human error
Perfect for Monthly Payroll
Monthly payroll processing makes this approach ideal - you'll only need to export and import once per month, taking approximately 30 minutes total. This gives you 80% of the benefits of full integration with 20% of the complexity.
Prerequisites
Before You Begin
Gusto Admin Access
You need admin access to Gusto with one of these permissions:
- • Run payroll
- • View payroll reports and tax filings
Odoo Setup
Ensure you have:
- • Odoo Accounting module installed
- • Chart of accounts configured
- • Payroll journal created
- • Import permissions in Odoo
Account Mapping Plan
Prepare your account mapping between Gusto and Odoo:
- • Identify corresponding accounts
- • Document the mapping
- • Test with sample data
Method 1: Standard Payroll Journal Report
Recommended for Most Users
This is the simplest method to get started. Gusto's standard Payroll Journal Report provides all the essential data you need for Odoo import.
Step-by-Step Instructions:
Log into Gusto
Sign in to your Gusto admin account using your credentials.
Navigate to Reports
Click on the "Reports" tab in the left navigation menu.
Select Payroll Journal Report
From the available reports, locate and select the "Payroll Journal Report".
Set Date Range
Configure the report for your monthly payroll period:
- • Select start date (first day of month)
- • Select end date (last day of month)
- • Or choose specific payroll dates
Export as CSV
Choose CSV format for easy import into Odoo:
- • Click "Generate Report"
- • Select format: CSV (not PDF)
- • Download the file
Important Note:
The standard Payroll Journal Report may not map perfectly to your Odoo chart of accounts. You may need to manually adjust account codes after export or use Method 3 (General Ledger Mapper) for automatic mapping.
Method 2: Custom Reports
Most Flexible Approach
Create custom reports tailored to your specific needs. This method gives you complete control over which data fields to include and how to structure the export.
Step-by-Step Instructions:
Access Custom Reports
Navigate to Reports → Custom Report in your Gusto dashboard.
Configure Report Structure
Set up how you want your data organized:
- • Break down by: Payroll, Employee, or Work Address
- • Time period: Select your monthly date range
- • Specific payrolls: Choose individual payroll runs
Select Data Columns
Choose which fields to include in your export:
| Essential Columns for Odoo | Optional Columns |
|---|---|
|
• Gross earnings • Total employee deductions • Total employer contributions • Total employee taxes • Total employer taxes • Net pay |
• Employee details • Department breakdown • Job codes • Project tracking • Overtime details • Benefit specifics |
Save as Template
Create a reusable template for future months:
- • Click "Save as Template"
- • Name it "Monthly Payroll Journal for Odoo"
- • This saves time for future exports
Export to CSV
Generate and download your custom report:
- • Click "Download" button
- • Select CSV format
- • Save file with descriptive name
Pro Tip:
Once you've created your template, future monthly exports will take less than 5 minutes. Just load the template, adjust the date range, and export!
Method 3: General Ledger Mapper
Advanced Account Mapping
The General Ledger Mapper allows you to map Gusto expense categories directly to your Odoo chart of accounts. This provides the most accurate and automated account mapping.
Initial Setup (One-time):
Access General Ledger Mapper
Navigate to App Directory → Accounting → General Ledger Mapper:
- • Go to App Directory in Gusto
- • Under "Categories," choose Accounting
- • Select General Ledger Mapper
- • Click "Connect"
Upload Odoo Chart of Accounts
Export your chart of accounts from Odoo and upload to Gusto:
Column 1: Account Codes (e.g., 620000)
Column 2: Account Names (e.g., Salaries & Wages)
- • Export chart of accounts from Odoo as CSV
- • Click "Upload CSV" in Gusto
- • Choose your file and click "Open"
Map Gusto Categories to Odoo Accounts
Connect each Gusto expense category to corresponding Odoo account:
| Gusto Category | Typical Odoo Account |
|---|---|
| Gross Wages | 620000 - Salaries & Wages |
| Federal Tax | 241000 - Federal Tax Payable |
| State Tax | 241100 - State Tax Payable |
| FICA | 241200 - FICA Payable |
| Health Insurance | 241300 - Benefits Payable |
| Net Pay | 211000 - Payroll Payable |
Configure Advanced Options (Optional)
Set up additional mapping by departments, jobs, or projects:
- • Department mapping: Different accounts per department
- • Job code mapping: Separate tracking by job roles
- • Project mapping: Track costs by project
Monthly Export Process:
Navigate to Pay History
Go to Pay → Pay History in your Gusto dashboard.
Select Monthly Payroll
Find your monthly payroll run and click "View Details".
Download Mapped Report
Click "Download" to get your pre-mapped CSV file ready for Odoo import.
Key Advantage:
Once configured, the General Ledger Mapper automatically applies your account mappings to every export. This eliminates manual account code adjustments in Odoo.
Account Mapping Guide
Proper account mapping is crucial for accurate financial reporting. Here's a comprehensive guide to mapping common Gusto payroll categories to standard Odoo accounts.
Standard Account Mapping
| Gusto Category | Account Type | Odoo Account Code | Odoo Account Name | Notes |
|---|---|---|---|---|
| Gross Wages | Expense | 620000 | Salaries & Wages | Total employee compensation |
| Federal Income Tax | Liability | 241000 | Federal Tax Payable | Employee tax withholding |
| State Income Tax | Liability | 241100 | State Tax Payable | State-specific withholding |
| Social Security (Employee) | Liability | 241200 | FICA Payable | Employee portion |
| Medicare (Employee) | Liability | 241201 | Medicare Payable | Employee portion |
| Social Security (Employer) | Expense | 625000 | Payroll Tax Expense | Employer portion |
| Medicare (Employer) | Expense | 625001 | Medicare Tax Expense | Employer portion |
| FUTA | Expense | 625100 | Federal Unemployment Tax | Employer federal unemployment |
| SUTA | Expense | 625200 | State Unemployment Tax | Employer state unemployment |
| Health Insurance | Liability | 241300 | Benefits Payable | Employee benefit deductions |
| 401k Employee | Liability | 241400 | 401k Payable | Employee retirement contributions |
| 401k Employer Match | Expense | 626000 | Retirement Benefits Expense | Company match expense |
| Net Pay | Liability | 211000 | Payroll Payable | Amount paid to employees |
Important Considerations:
- • Account codes may vary based on your Odoo chart of accounts setup
- • Some businesses prefer to separate payroll taxes by state
- • Consider department-specific wage accounts for better reporting
- • Verify account types (Asset, Liability, Expense) match your setup
Importing to Odoo
Once you've exported your payroll data from Gusto, follow these steps to import it into Odoo accounting.
Step-by-Step Import Process
Prepare the CSV File
Clean and format your Gusto export for Odoo import:
- • Remove unnecessary columns
- • Ensure account codes match your Odoo chart
- • Verify date formats (YYYY-MM-DD)
- • Check for any special characters
Access Odoo Journal Entries
Navigate to the journal entry import function:
- • Go to Accounting → Miscellaneous → Journal Entries
- • Click "Import" or "Upload" button
- • Select your prepared CSV file
Map CSV Columns
Match your CSV columns to Odoo fields:
| CSV Column | Odoo Field |
|---|---|
| Date | Date |
| Account Code | Account |
| Description | Label |
| Debit | Debit |
| Credit | Credit |
| Reference | Reference |
Preview and Validate
Review the import preview before processing:
- • Check that debits and credits balance
- • Verify account codes are correct
- • Ensure dates are properly formatted
- • Review any error messages
Import and Post
Complete the import process:
- • Click "Import" to process the data
- • Review the created journal entries
- • Post the entries when satisfied
- • Create a backup before posting
Import Template Tip:
After your first successful import, save the column mapping as a template in Odoo. This will streamline future monthly imports to just a few clicks.
Best Practices
Do's
- Create a monthly routine - process payroll and export immediately
- Use consistent file naming: "Payroll_YYYY_MM_Gusto.csv"
- Always export as CSV, not PDF
- Set up import templates in Odoo for consistency
- Keep backup copies of all export files
- Document your account mapping for reference
- Review imported entries before posting
- Reconcile with bank statements monthly
Don'ts
- Don't wait until tax season to start exporting
- Don't manually edit account codes in CSV - use mapping
- Don't skip the preview step in Odoo imports
- Don't delete original export files after import
- Don't post entries without balancing verification
- Don't change account mapping mid-year without documentation
- Don't rely on memory - document your process
- Don't forget to update mappings when adding new payroll items
Monthly Workflow Checklist
Week 1 (Payroll Processing)
- □ Process monthly payroll in Gusto
- □ Verify all employees and amounts
- □ Submit payroll for processing
Week 2 (Export & Import)
- □ Export payroll journal from Gusto
- □ Review and clean CSV file
- □ Import into Odoo
- □ Verify import accuracy
Week 3 (Reconciliation)
- □ Reconcile with bank statements
- □ Post journal entries
- □ Review payroll reports
- □ File export for records
Troubleshooting
Common Issues & Solutions
Issue: CSV Import Fails in Odoo
The CSV file won't import or shows errors
- • Check CSV format - ensure UTF-8 encoding
- • Verify account codes exist in Odoo
- • Remove special characters from descriptions
- • Ensure debits and credits balance
- • Check date format is YYYY-MM-DD
Issue: Account Mapping Errors
Transactions are posting to wrong accounts
- • Review and update General Ledger Mapper settings
- • Verify account codes in both systems
- • Check for new payroll items in Gusto
- • Update account mapping documentation
Issue: Unbalanced Journal Entries
Debits don't equal credits in imported entries
- • Check for missing entries in Gusto export
- • Verify all payroll components are included
- • Review employer tax calculations
- • Check for rounding differences
Issue: Missing Payroll Data
Some payroll information is not appearing in reports
- • Verify date range covers all payroll periods
- • Check user permissions in Gusto
- • Ensure payroll is fully processed
- • Review report filters and settings
Getting Help
Gusto Support
- • Gusto Help Center
- • Live chat in your Gusto account
- • Phone support for admin users
Odoo Support
- • Odoo Documentation
- • Community forums
- • Professional support services
Official Resources & Documentation
Essential Links
Gusto Official Documentation
Quick Reference
Gusto Login: https://app.gusto.com/login
Gusto Support: https://support.gusto.com/
Odoo Documentation: https://www.odoo.com/documentation
Conclusion
Exporting payroll data from Gusto to Odoo doesn't have to be complicated. With the right approach and a consistent monthly routine, you can maintain accurate financial records without the complexity of custom integrations.
Key Takeaways:
- • Monthly payroll processing makes this approach highly manageable
- • Choose the method that best fits your business complexity
- • Consistent processes reduce errors and save time
- • Proper account mapping is crucial for accurate reporting
- • This solution provides 80% of integration benefits with minimal complexity